[Matlab] Menghitung Jumlah Kombinasi dalam Matrix

Ini merupakan salah satu contoh code yang digunakan untuk menghitung jumlah kombinasi dalam matriks. Misalnya diberikan contoh data_matrix yang berukuran 1×6 seperti pada baris code, dan disediakan matriks berukuran 5×5 untuk menampung jumlah kombinasi dari data_matrix. Diberikan contoh output yang diharapkan seperti berikut :

Screen Shot 2014-07-14 at 11.40.52 pm

Pada data_matrix dibuat sebuah increment index dengan cara :

  • data_matrix –> 2, 3, 4, 2, 3 ,3 dimana kombinasi akan ditulis (a- b), a didapatkan dari index pertama, b didapatkan dari index kedua, dan seterusnya. Jika dibuat sebagai rumus maka a=index ke-i, dan b adalah index ke-i +1. Selanjutnya, kombinasi akan dibuat seperti berikut :
  • Kombinasi 2 – 3 menghasilkan 1
  • Kombinasi 3 – 4 menghasilkan 1
  • Kombinasi 4 – 2 menghasilkan 1
  • Kombinsi 2 – 3 menghasilkan 2 (ditambah 1, karena kombinasi 2-3 sudah terdapat pada proses sebelumnya)
  • Kombinasi 3-3 menghasilkan 1

Hasil tersebut diletakkan dalam matriks, dimana baris adalah a dan kolom adalah b. Di bawah ini adalah contoh code untuk membangun penyelesaian masalah tersebut.

[code language=”matlab”]
clear
clc

data_matrix = [2 3 4 2 3 3]; % contoh matrix
ukuran_matrix = 5; % kombinasi matrix yang akan dibentuk

fdcm = zeros(ukuran_matrix, ukuran_matrix);
for a=1:size(data_matrix,2)-1
b=a+1;
for i=1:ukuran_matrix
for j=1:ukuran_matrix
if(i==data_matrix(a) && j==data_matrix(b))
fdcm(i,j)=fdcm(i,j)+1
end
end
end
end
[/code]

Selamat mencoba 🙂 To: @Evy Kamilah 🙂

[Matlab] Classifying Image based on Its Label

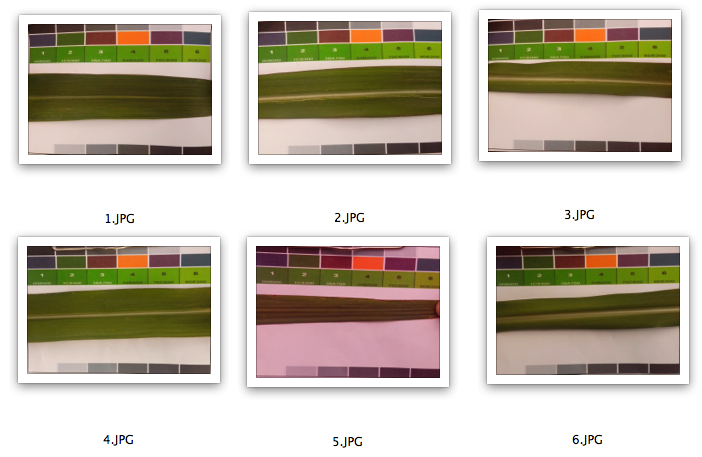
Let’s back in MATLAB code. Now, I would like give an example for classifying images based on its label. Below, we have six images and in each has label, i.e 1.JPG ( label 1), 2.JPG (label 1), 3.JPG (label 2), 4.JPG (label 2), 5.JPG (label 1), and 6.JPG (label 2). We’re going to cluster images which has label 1.

Screen Shot 2014-06-27 at 3.19.41 pm

Here the code of function of classifying images. Please save it into Cluster.m.

[code language=”matlab”]
% fungsi ini digunkaan untuk menampilkan gambar2 yang berada pada kelas
% yang sama
% folder = nama folder yang berisi gambar-gambar
% label = label dari masing-masing gambar
function Cluster(folder,label,kelas)

a=find(label==kelas); % membaca indeks klasifikasi sesuai dengan kelas yang diinputkan
files = dir([folder,’*.JPG’]);
m=struct2cell(files);

figure
for k=1:size(a,1) % looping sesuai banyaknya anggota dalam kelas yang diinputkan
file = [folder m{1,a(k)}]; % file yang dikelompokkan sesuai dengan kelasnya
readfile =imread(file); % membaca file
subplot(2,2,k), imshow(readfile), title ([‘kelas’,num2str(kelas),’-‘,num2str(a(k))]);
end
[/code]

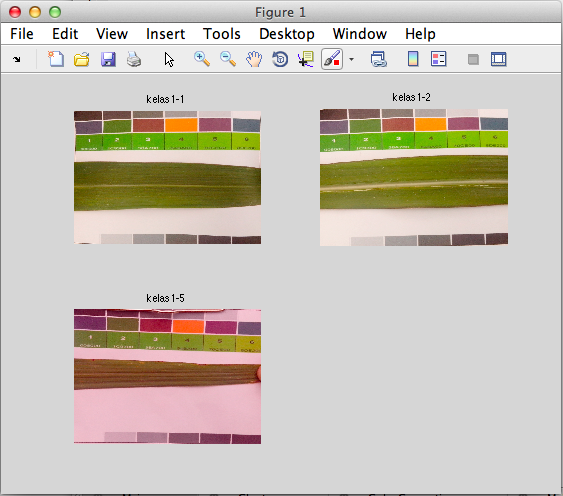
And you may run this code below as Main. We would like to show all images which is placed in label 1 and the output of this Main is shown in Figure 1

[code language=”matlab”]
clear
clc
close all

folder = ‘daun/’; % nama folder
label = [1;1;2;2;1;2]; %nama label

Cluster(folder,label,1);
[/code]

Screen Shot 2014-06-27 at 3.16.16 pm

Well,  this phase may help you to cluster the images well. This code presented for @Evy Kamilah 🙂 Good luck Evy 🙂

[Matlab] How to Retrieve Color from Segmented Image?

Back to code, yeah! Still in the simple code. Yep, simple code that is still quite make several people not clearly enough hove to solve it. At the moment, we will discuss about how to retrieve or return the color of segmented image. This topic is still related to image processing or computer vision, so if you are not in that specific interest area, perhaps it is not too useful. However if you are one of the people who has high curiosity, it is not close opportunity to give inquire if there is anything you want to know.

In this case, for instance  I have an image as shown below. Do you know what is that? (Yep, tomato :D). Segmentation is mostly happened in the first step in image processing. We have to recognize the object of an image to be processed in the next phase. Otsu thresholding was used in this case, and you can modified of Otsu thresholding as you wish in order to upgrade the quality of the segmentation. As we know, there are a lot of algorithms nowadays that compete to achieve the best segmentation, and it is always an open case. Well, you can follow this code right now to try.

tom

[code language=”matlab”]
% Copyright by Yuita Arum Sari
% This function is able to retrieve or return original color from the
% foreground of an image
% Input : file name of the image (full path, if applicable)

function retrieveColor(fileImage)

% read image
I = imread(fileImage);

%segmented image with Otsu thresholding
level = graythresh(I);
BW = im2bw(I,level);

% Retrieve color from segmented image
dim = size(BW);

% initialization of an image
retrieved = zeros (dim);
[a b]= size(BW);
retrieved = imresize(I,[a b]);

Bw = ~BW; % inverse black and white
R = retrieved(:,:,1).* uint8(Bw);
G = retrieved(:,:,2).* uint8(Bw);
B = retrieved(:,:,3).* uint8(Bw);

% retrieved color
retrieved(:,:,1) = R;
retrieved(:,:,2) = G;
retrieved(:,:,3) = B;

figure
subplot(1,3,1), imshow(I), title (‘Original Image’);
subplot(1,3,2), imshow(Bw), title (‘Segmented Image’);
subplot(1,3,3), imshow(retrieved), title (‘Retrieved Color’);
[/code]

Have you finished to code it? Alright, you can event copy paste this function to try. Then, you can run code by this code

[code language=”matlab”]
retrieveColor(‘tom.jpg’)
[/code]

Screen Shot 2014-05-29 at 12.44.03 pm

From picture above, you can see original image, segmented image, and retrieved color, respectively. If you want to deal with gaining teh RGB value, you can add by your own :

[code language=”matlab”]
function [R,G,B]= retrieveColor(fileImage)
[/code]

Well, is it easy? 😀 Do you want anything to share related this post? I am welcoming of your comment. Thank you!  🙂

[Matlab] Read Multiple Images in a Folder

Hello guys,  in this occasion I would like to share about how to read multiple images in a folder, and save the information into array. This code is conducted by Matlab, that really approachable for graduate students (subjective opinion 😀 ) . I’ll present this code for my lovely friend Ratih, and perhaps is also helpful for you all, because this case is often happened when we talk about classification, clustering, information retrieval in image processing or computer vision.

Well, for instances I have a folder named “capturedImage” as shown in a figure below. In a folder contains 24 images (let’s say 24 different colors below are 24 images hehe..).

Screen Shot 2014-02-21 at 5.42.55 pm

Let’s read the information inside image into code that is described in a brief code below. In every line has its own narrative and may help you to understand what is the code indicate. I’ll take a case about how to get mean among intensities in every image, so I used data_mean to define collected information of all images in a folder through an array. Check this code out.

[code language=”matlab”]
% Cara ini digunakan untuk membaca gambar-gambar dalam satu folder
% dan kemudian meletakkkan nilai fitur gambar tersebut ke dalam sebuah
% array
% =====================================================================

clc
clear

gambar = ‘capturedImage/’; % nama folder "campturedImage"
% mengindetifikasi isi folder dalam file yang berekstensi .JPG
files = dir([gambar,’*.JPG’]);

m=struct2cell(files); % menentukan informasi gambar yang ada dalam folder
data_mean=[]; % inisialisasi awal array

for k=1:size(m,2)
file = [gambar m{1,k}]; % identifikasi nama file beserta path-nya
dataMean = mean(mean((file))) % menghitung mean dari masing-masing gambar
data_mean=[data_mean;dataMean]; % memasukkan data mean ke dalam array
end
[/code]

Ok, that’s all 🙂 As usual the open question to share is free welcome. Thank you and happy coding 🙂

[Matlab] Menambahkan Border pada Gambar

1 Januari 2014, kalender Masehi. Dengan mengucap basmallah, maka lahir postingan pembuka pagi, mengenai how to add border in image using Matlab 🙂 . Ceritanya adalah penasaran dan butuh untuk melengkapi salah satu program klasifikasi yang sedang saya buat,  so that saya buat fungsi yang namanya AddingBorder.m which was conducted by MATLAB environment.

Well, harapannya output program jadi seperti gambar di bawah, gambar bunga, dengan border kotak warna hijau dan ketebalannya bisa di-setting sesuai keinginan 😀

Screen Shot 2014-01-01 at 9.00.30 am

Kurang lebih fungsi yang saya buat seperti dibawah ini :

[code language=”matlab”]
%==============================================================================================
% Author : yuitaarumsari @2013
% Program ini merupakan pengembangan dari forum pada link dibawah
% http://stackoverflow.com/questions/5447150/matlab-image-processing-bound-image-by-a-rectangle
% Fungsi ini digunakan untuk membuat border pada sebuah gambar dengan
% ketebalan tertentu dan warna yang bisa kita customize sendiri.
% OUTPUT : berupa matriks 3 dimensi yang merepresentasikan gambar yang
% telah memiliki border
% INPUT : ‘inputFileGambar’ –> input image
% R, G, B –> warna border yang diinginkan dengan nilai R, G, B
% tertentu
% thick –> ketebalan border yang diinginkan
%==============================================================================================

function [im]=AddingBorder(inputFileGambar,R,G,B,thick)
im=imread(inputFileGambar);
[m n l]=size(im);
x = 1;
y = 1;
w = n;
h = m;

% border samping kanan
im(y:y+h,x:thick,1) = R;
im(y:y+h,x:thick,2) = G;
im(y:y+h,x:thick,3) = B;

% border samping kiri
im(y:y+h,x+w-thick:w,1) = R;
im(y:y+h,x+w-thick:w,2) = G;
im(y:y+h,x+w-thick:w,3) = B;

% border atas
im(y:thick,x:x+w,1) = R;
im(y:thick,x:x+w,2) = G;
im(y:thick,x:x+w,3) = B;

% border bawah
im(y+h-thick:h,x:x+w,1) = R;
im(y+h-thick:h,x:x+w,2) = G;
im(y+h-thick:h,x:x+w,3) = B;
[/code]

Kode diatas  juga saya customize dari forum ini. Untuk penjelasan input dan output sudah saya sertakan dalam code-nya. Cukup simpel sih, hanya googling dan nyoba-nyobanya bikin gemes :D. Makanya benar kata pepatah, thinking simply and it will be simple 😀 .

Sekian, semoga bermanfaat 😀 . Happy coding 🙂

[Matlab] How to Split Image into Small Parts

Split image is one of methods for understanding image in details. Usually, this function is applied in several programs of computer vision or pattern recognition.  Before we code, prepare a picture which will be split into small dimensions. For instance,  you can see a cat as shown below  (Is it right that a cat is so innocent ? 😀 ) . I called this image file with “Kucing.png”

1185689_654528644557537_1774417776_n
From the image above, now we will split in, and put every single part into a folder which named “folderPus”. The results of running program is shown below.  How build a function of split image in Matlab code? Well, let check this out!

Screen Shot 2013-08-19 at 5.18.26 AM

Here some codes in Matlab. I have explained through comments among codes.  You can save this function using file name “Split.m”

[code language=”matlab”]
% Created by Yuita Arum Sari
% Input yang dibutuhkan adalah
% file : nama file tempat kita meletakkan file gambar
% dimensi : ukuran dimensi yang digunakan untuk memotong gambar menjadi
% bagian yang lebih kecil
% folderTitle : folder tempat menyimpan file-file gambar dengan dimensi
% yang lebih kecil

function Split(file,dimensi,folderTitle);

[pathstr, name, ext] = fileparts(file);
gambar=imread(file);
[panjang lebar tinggi]=size(gambar);

% pecahan dimensi panjang
% banyaknya kotak dari panjang berdasarkan dimensi
p=[];
panjang=panjang/dimensi;
for i=1:panjang;
p=[p;i*dimensi];
end

% pecahan dimensi lebar
% banyaknya kotak dari lebar berdasarkan dimensi
l=[];
lebar=lebar/dimensi;
for i=1:lebar;
l=[l;i*dimensi];
end

% menambahkan elemen 0 diatas data panjang
pjg=[0;p];
% menambahkan elemen 0 diatas data lebar
lbr=[0;l];

jumlah=size(l,1);
folder=(folderTitle); % mendeklarasikan nama folder
mkdir(folder); % mebuat folder baru
% relative path yang digunakan untuk menyimpan file gambar yang telah
% terpotong kecil-kecil
basePath = ([‘/Users/yuitaarumsari/Documents/testing/’,folder])

for k=1:size(p,1)
a=k
for i=1:a
for j=1:size(l,1)
g=gambar(1+pjg(i):p(i),1+lbr(j):l(j),:)
baseFileName = sprintf(([name,’-‘,’%d.png’]), j+jumlah*(a-1));
fullFileName = fullfile(basePath, baseFileName);
imwrite(g, fullFileName, ‘png’);
end
end
end
[/code]

And you can run function above using these codes

[code language=”matlab”]
file = ‘/Users/yuitaarumsari/Documents/testing/Kucing.png’;
dimensi = 100;
folderTitle = ‘folderPus’;
Split(file, dimensi, folderTitle);
[/code]

Well, that’s my simple case and you can improve or modify the code based on your necessity. Happy coding! 🙂